
AI Employees
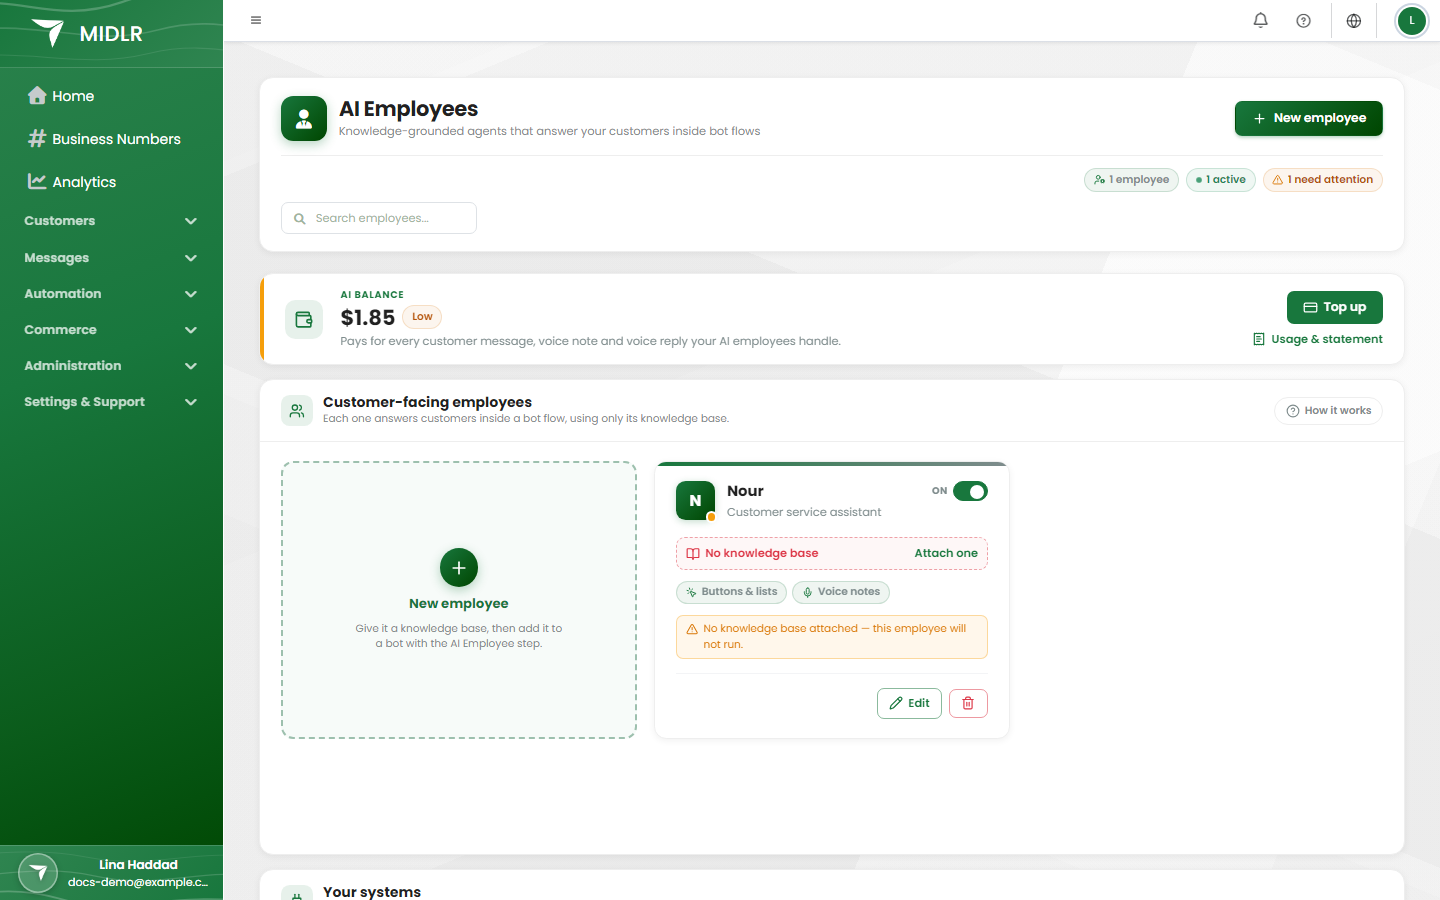
An AI Employee answers your customers on WhatsApp in plain conversation. It reads what the customer writes (or says, in a voice note), answers from the information you gave it, offers buttons and lists, and steps aside when the customer wants a person. It works inside a bot: the bot decides when the AI Employee takes over.
Before you start
- AI Employees are available to businesses on a paid plan or an active demo. If you don't see AI Employees in your sidebar under Automation, check your plan or contact support.
- AI usage is paid from your prepaid AI wallet. With an empty wallet, AI Employees pause.
- You need permission to see AI Employees, and a separate permission to create and change them. See Roles & permissions.
- You need a knowledge base file (see below).
How it works
Setting up an AI Employee takes three steps, which the page also shows you:
- Upload a knowledge base — one file with the employee's role, tone, rules and facts.
- Create the employee — name it, pick its knowledge base and choose what it can do.
- Add it to a bot — in the Bot Factory, add an AI Employee node and choose this employee. From that point in the bot, the AI takes over the chat.
Write and upload a knowledge base
The knowledge base is the employee's whole brief. The employee answers only from it, by design. If something isn't in the file, the employee won't make it up.
- It is one Markdown (
.md) text file, up to 64 KB. - Put everything in it: who the employee is, how it should talk, what it must and mustn't do, and the facts (products, prices, opening hours, policies, addresses, links).
- Your Midlr account team can help you write it.
To upload it:
- On the AI Employees page, click Upload .md (or Upload new inside the employee editor).
- Give it a Name (optional; it defaults to the file name) and choose the File.
- Click Upload.
To change the knowledge base later, upload a new file and pick it for the employee. You can Download a knowledge base from the editor. You can only Delete a knowledge base that no employee is using.
TIP
Links in the knowledge base can be used by the employee. For example, a line like "Showroom photo: https://…" lets it send that picture, and a map link can go behind a button. See Pictures, links and reactions.
Create an AI Employee
- Click New employee.
- Under Identity, enter a Name (for example "Sara") and, if you like, a Position (for example "Support agent").
- Under Knowledge, choose the Knowledge base. Without one, the employee will not run at all.
- Optional: add Extra instructions (up to 2,000 characters) for a small tweak. The knowledge base always wins; anything about role, tone or facts belongs in the file.
- Choose the voice, message and ability options described below.
- Leave Active on.
- Click Create.
Midlr chooses the AI model for you; there are no model settings to tune.
Every employee always replies with text, buttons and lists, and understands taps on them. A system Exit AI button is always attached so the customer can leave the AI and reach your team.
Voice
| Setting | What it does |
|---|---|
| Understand voice notes | The employee listens to the customer's voice notes (they are turned into text first). Each voice note heard is charged to your AI wallet, so turn this off for an employee that only needs to read text. |
| Reply with voice notes | Shown only when Understand voice notes is on. Choose when the employee answers with a spoken voice note instead of text. |
Choices for Reply with voice notes:
| Option | When the employee speaks |
|---|---|
| Never — always reply in text | Never. |
| Reply by voice when the customer sends a voice note | Only when the customer used a voice note. Text otherwise. |
| Always reply by voice | Every plain reply is spoken. Questions with options stay as tappable buttons. |
| Let the employee decide each time | It speaks when that fits, and writes when the answer has prices, numbers or steps to follow. |
When the employee speaks, you can also choose its voice.
Good to know about voice replies:
- A voice note can't carry buttons, so spoken replies have no Exit AI button. The button still appears on every question with options, so the customer always has a way to reach a person.
- Anything with a link, or too long to listen to, is sent as text automatically.
- Each voice reply is charged to your AI wallet.
Pictures, links and reactions
These options are all on by default. Untick the ones you don't want.
| Option | What the employee can send |
|---|---|
| Pictures, videos and PDFs | Files from links in the knowledge base or in your systems' answers. |
| Links behind a button | A map, a booking page or a menu opens from a button instead of a pasted web address. |
| Swipeable cards | Several products, a recipe's ingredients or a shopping route as picture cards the customer swipes through, instead of a long list. The customer can tap a card's button to pick it. |
| Emoji reactions | Now and then, a 👍 or ❤️ on the customer's message, the way a person would. |
The employee only sends links that are in its knowledge base or came back from your systems, never a link a customer sent.
Abilities
| Setting | What it does |
|---|---|
| Can also: Send the booking flow | The employee can send your booking form in the middle of the conversation. You pick which form in the bot's AI Employee node. Sending the form ends the AI conversation. See Forms and Bookings. |
| Can see: Contact name and number | The employee knows who it is talking to. |
| Can see: Earlier conversation | The employee sees what was discussed before this AI conversation, so it doesn't ask again. |
Actions in your systems
Here you tick which of your API actions this employee may use (up to 15 per employee). You create actions under Your systems; see Connect your AI to your own systems.
Put an AI Employee to work
An AI Employee answers only where you place it in a bot. The bot's business number and trigger decide which numbers and which customers it talks to.
- In the sidebar, under Automation, click Bot Factory.
- Create or edit a bot. Add a trigger, for example a Text Trigger set to Any Message.
- Add an AI Employee node after it and pick the employee under Employee. Employees that can't run yet are marked "(not ready)".
- If the employee can send the booking flow, choose the Booking flow in the same node.
- Optional but recommended: after the AI Employee node, add what should happen when the AI conversation ends, for example a Transfer Chat node that assigns the chat to an agent.
- Save the bot and make sure it is active.
TIP
If the employee has Understand voice notes on, a voice note from the customer can start this bot too.
What happens during the conversation
- The employee keeps the conversation until it ends. Customer messages go to the AI, not to the bot's keyword triggers.
- The conversation ends when:
- the customer taps Exit AI (they get the message "You're back with our team.");
- the employee decides to hand over, for example because it isn't sure of an answer;
- the employee sends the booking flow;
- the conversation reaches its length limit. If nothing follows the AI Employee node, the customer is told the conversation reached its limit and that writing again starts a new one;
- your AI wallet runs empty, or you switch the employee off.
- When it ends, the bot continues with the node after the AI Employee node. If there is none, the bot simply stops.
- If the customer comes back after 24 hours of silence, they start fresh in the bot instead of continuing the old AI conversation.
Hand the customer to a person
The AI Employee itself doesn't assign chats to agents. To get a person involved:
- Put a Transfer Chat node right after the AI Employee node in the bot. When the customer taps Exit AI, or the AI hands over, the chat is assigned to your agent or group.
- Write in the knowledge base when the employee should hand over and what it may promise (for example, "a colleague will reply within business hours").
- In the inbox, use Stop Bot on a chat to stop all automatic replies, including the AI, for that customer. See Bot Factory.
Connect your AI to your own systems
You can let an AI Employee look things up or do things in your own software, for example "Check order status" or "Book an appointment". You connect your system once, add actions, and give the actions to employees.
INFO
This needs your system to have an API (a way for other software to talk to it). Usually a developer sets it up.
Add a connection
- On the AI Employees page, in Your systems, click Connect a system.
- Enter a Name (for example "Clinic system") and the Base URL of your API. It must start with
https://. - Under Login, choose how your API checks who is calling: No login, Bearer token, API key in a header or Username and password, and fill it in.
- Optional: add headers sent with every request (for example a branch ID). Values are stored encrypted.
- Click Add.
You can have up to 10 connections. Turning a connection's Active switch off stops every action on it at once.
Add an action
- Click New action (or Action on a connection).
- Under What it does, give it a Name (for example "Check order status") and choose the Connection.
- Fill in When should the AI use it?. Write it like a note to a new colleague, for example "When the customer asks where their order is or when it will arrive." The AI reads this to decide when to call it.
- Under Request, choose the method and the path (for example
/orders/{order_number}). - Under Details the AI collects from the customer, add each detail it needs (for example an order number or a date), its type (Text, Number, Yes / no, Date, Time or Choice) and whether it is Required. The AI asks the customer for each required detail before it calls.
- Optional: Values you set are sent every time (for example source = whatsapp). The AI never sees or changes them. From the chat can send the customer's phone number or name automatically.
- Under What the AI gets back, list the fields of the answer the AI should read. Easiest: click Test, then click the fields you want. Fewer fields keep the AI focused and cost less.
- Click Add action.
- Open the employee, tick the action under Actions in your systems, and save.
Actions that change data need the customer's Confirm tap
Lookups (method GET) run straight away. Any action that changes something in your system (for example a booking or a cancellation) never runs on the AI's word alone:
- The AI collects the details.
- The customer receives a Confirmation question with Confirm and Cancel buttons, in their language. You write the question in the action, for example "Book {service} on {date} at {time}?". Leave it empty to show a list of the details.
- The action runs only if the customer taps Confirm. Typing "yes" doesn't count.
- If the customer doesn't tap within 10 minutes, the question expires and nothing happens.
WARNING
Actions act on your real system. Test each action with Test before you give it to an employee, and keep the fields the AI gets back to what it needs.
Pause, edit or delete an employee
- Use the On / Off switch on the employee's card to pause it without deleting it. A bot that reaches a paused employee carries on with its next node.
- Click Edit to change any setting.
- Click the bin icon to delete it. Any bot using it stops getting AI answers at that step, so update those bots first.
A card shows a warning when the employee can't run, for example when it has no knowledge base or your AI wallet is empty. The page header counts how many employees need attention.
Test an AI Employee
There's no separate test chat for AI Employees, so test with a real phone:
- Put the employee in an active bot (for example with a keyword only you will send).
- From a WhatsApp number that is not your business number, send the trigger message.
- Ask the questions your customers ask. Try a voice note, tap the buttons, try Exit AI, and try an action with Confirm and Cancel.
- Check the conversation in the inbox, and the cost under Usage & statement on the AI balance.
Then improve the knowledge base and upload the new version.
Team assistant (Midra)
Beta
Midra is in beta. It may change, and it isn't available to every business yet.
Besides the AI Employees that talk to your customers, Midlr has a team assistant for your staff, called Midra. It answers your team's questions about your own data from any page, for example "How many new leads did we get this week?". It never talks to customers.
- Each person sees only what they could already see in Midlr.
- It is read-only: it can't change or delete anything.
- Every question is logged.
- Its questions are paid from your AI wallet.
This feature is available to selected businesses. If you see the Team assistant card on the AI Employees page, an administrator can click Activate Midra. After that, anyone can click Ask Midra in the top bar (shortcut: Ctrl+J, or ⌘J on Mac) or open the full page with Open Midra.
Message content: by default Midra sees counts and dates of messages, not what they say. An administrator can click Allow… to let it read what customers write (for example to judge replies and tone), and can turn this off again at any time.