
Catalogs
A catalog is your list of products on WhatsApp. Once a catalog is linked to your WhatsApp account, customers can browse your products, add them to a cart and send you an order, all inside WhatsApp. Midlr lets you manage the products and send them to customers from the chat.
Your catalogs live in Meta's Commerce Manager. Midlr connects to them, so products you add or change in Midlr are saved to Meta, and products added in Meta show up in Midlr after a sync.
Before you start
- You need permission to view catalogs. If you don't see Catalogs under Commerce in your sidebar, ask your admin. See Roles & permissions.
- Connecting to Facebook, syncing and unlinking catalogs need extra permissions. If you see "Ask an admin to connect your catalogs.", someone with those permissions must do it.
Connect your catalogs
The first time you open Catalogs, you see Connect with Facebook.
- In the sidebar, under Commerce, click Catalogs.
- Click Continue with Facebook.
- Log in to Facebook and choose the business portfolio (Business Manager) that owns your catalogs. Allow access.
- Back in Midlr, click Sync Catalogs to load your catalogs.
Each catalog appears as a card.
Midlr can't create a new catalog. If your business doesn't have one yet, create it first in Meta's Commerce Manager, in the same business portfolio, then come back and click Sync Catalogs.
Link a catalog to WhatsApp
Only one catalog can be linked to your WhatsApp account at a time. The linked catalog is the one customers see.
- On the catalog's card, click Link Catalog.
- Wait for the Linked badge.
To change catalogs, click Unlink on the linked one, then link the other.
INFO
Some WhatsApp accounts can't unlink a catalog from Midlr. If you see Manual Unlinking Required, unlink it in Meta Business Suite instead.
A card that shows Not Available is linked to another business, so you can't use it here.
Add a product
- On the catalog's card, click View Products.
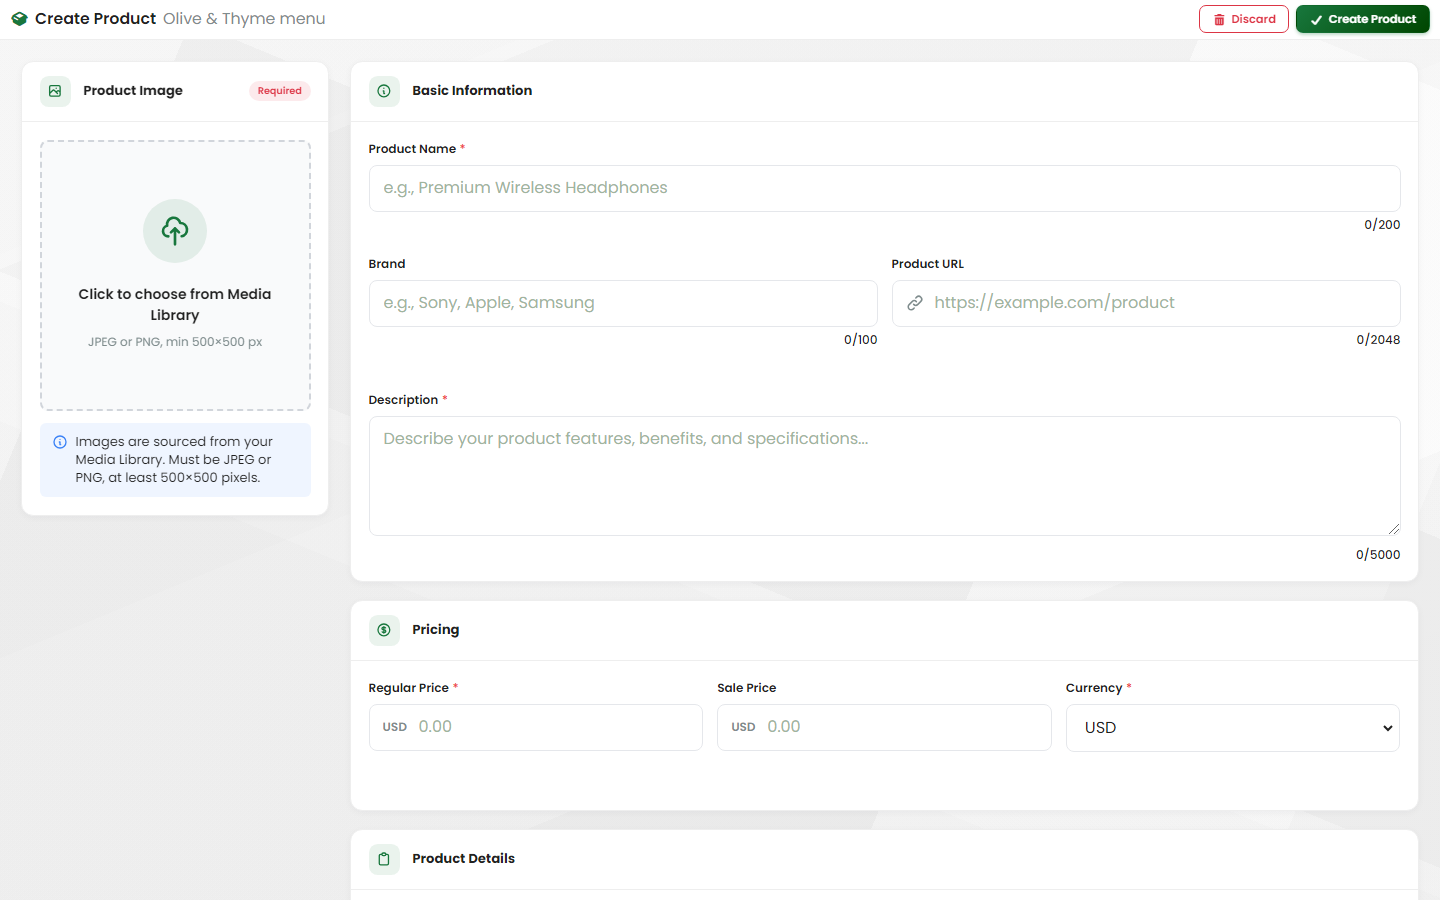
- Click Add Product.
- Fill in the details:
- Product Image: click Click to choose from Media Library and pick a picture. It must be JPEG or PNG, at least 500×500 pixels. See Media library.
- Basic Information: Product Name, Brand, Product URL (a page on your website) and Description.
- Pricing: Regular Price and Currency. Optionally a Sale Price with a Sale Period (start and end date).
- Product Details: availability (In Stock, Out of Stock, Pre-order and so on), condition (New, Refurbished, Used), Size, Color, Gender, Material, Pattern, Expiration Date.
- Categories: pick up to 3. Create categories first under Categories (below).
- Click Create Product.
The product is saved to your catalog on Meta.
Add many products at once
- On the products page, click Bulk Add.
- Click Download Template to get the Excel file.
- Fill it in: row 1 explains each field, row 2 has the column headers, and your products go from row 3. The file lists which fields are required.
- Drop the file into Upload Excel File (
.xlsxor.xls, up to 10 MB). - Midlr checks the file. If there are problems, it lists them so you can fix and upload again.
- Click Import Products.
Product images in the file must be JPEG or PNG, at least 500×500 pixels, up to 8 MB.
Variants (sizes, colors and so on)
Variants are versions of the same product, for example a T-shirt in red and blue, or in sizes S, M and L.
- Open the main product and add at least one variant attribute: Color, Size, Gender, Material or Pattern.
- Add a variant from the product. Give it at least one different attribute value. The brand and categories are copied from the main product.
On the products page, products with variants show View Variants. Pick the color, size and so on to see or delete one exact variant.
Organize products with categories
- On the products page, click Categories.
- Click Add Category, enter a Category Name and click Create.
- Use the edit and delete icons to rename or remove a category.
Edit or delete products
- To edit, open the product, change it and save.
- To delete one product, open it and delete it. To delete several, select them on the products page and click Delete.
- Tick Also delete product images from Media Library to remove their pictures too. Images used by other products are kept.
Deleted products can't be recovered.
Send products in a chat
- Open the chat. Click the attachment button and pick Product.
- Search and select the products to send (up to 30).
- Under Message Details, add a header and body text, and optionally a footer.
- Click Send Message.
The customer sees the products in WhatsApp and can add them to a cart and send you an order. The order appears in Orders.
If you see "You need to link a catalog first.", link a catalog (above).
TIP
Save product lists you send often as saved messages so your team can reuse them.
You can also share your catalog in other ways:
- A Catalog template that opens your catalog. See Templates.
- Bots and AI employees that show products to customers. See Bot Factory and AI Employees.