
Phonebooks
A phonebook is a named list of contacts, like "VIP customers", "Riyadh branch" or "Event guests 2026". You use phonebooks to pick who receives a campaign, and you can also use them to decide which agents see which chats.
One contact can be in many phonebooks. Removing a contact from a phonebook doesn't delete the contact.
Before you start
You need permission to see phonebooks. Creating phonebooks, adding contacts, importing, exporting and managing agents need their own permissions. See Roles & permissions.
Create a phonebook
- In the sidebar, under Customers, click Phonebooks.
- Click Create Phone Book.
- Enter a Phonebook Name (up to 30 characters).
- Click Create.
The Phone Books page shows each phonebook with its number of Customers, its Agents, and when it was Created and Modified. Use the search box and Sort By to find one. Click View to open it.
Phonebooks Midlr creates for you
Midlr fills some phonebooks automatically. You can't import into them or delete them:
| Phonebook | What's in it |
|---|---|
| Organic phone book | Customers who messaged your business number on their own. |
| Third Party Clients | Contacts added through your API & integrations. |
Add contacts to a phonebook
Open the phonebook, then pick one of these:
- New Client: type a phone number and details to create a new contact in this phonebook. If the number is already one of your contacts, Midlr loads their details and the button changes to Add to phone book.
- Attach Existing: search your saved contacts (type at least a few characters), tick one or more, and click Add. Contacts already in the phonebook are skipped.
- Import (under Actions): bring in a whole list from Excel. See below.
You can also add someone from a chat: open the chat and click ⋮ (more options) > Phonebooks. See Chatting.
Import contacts from Excel
Use this to upload a customer list from a spreadsheet.
Prepare your file
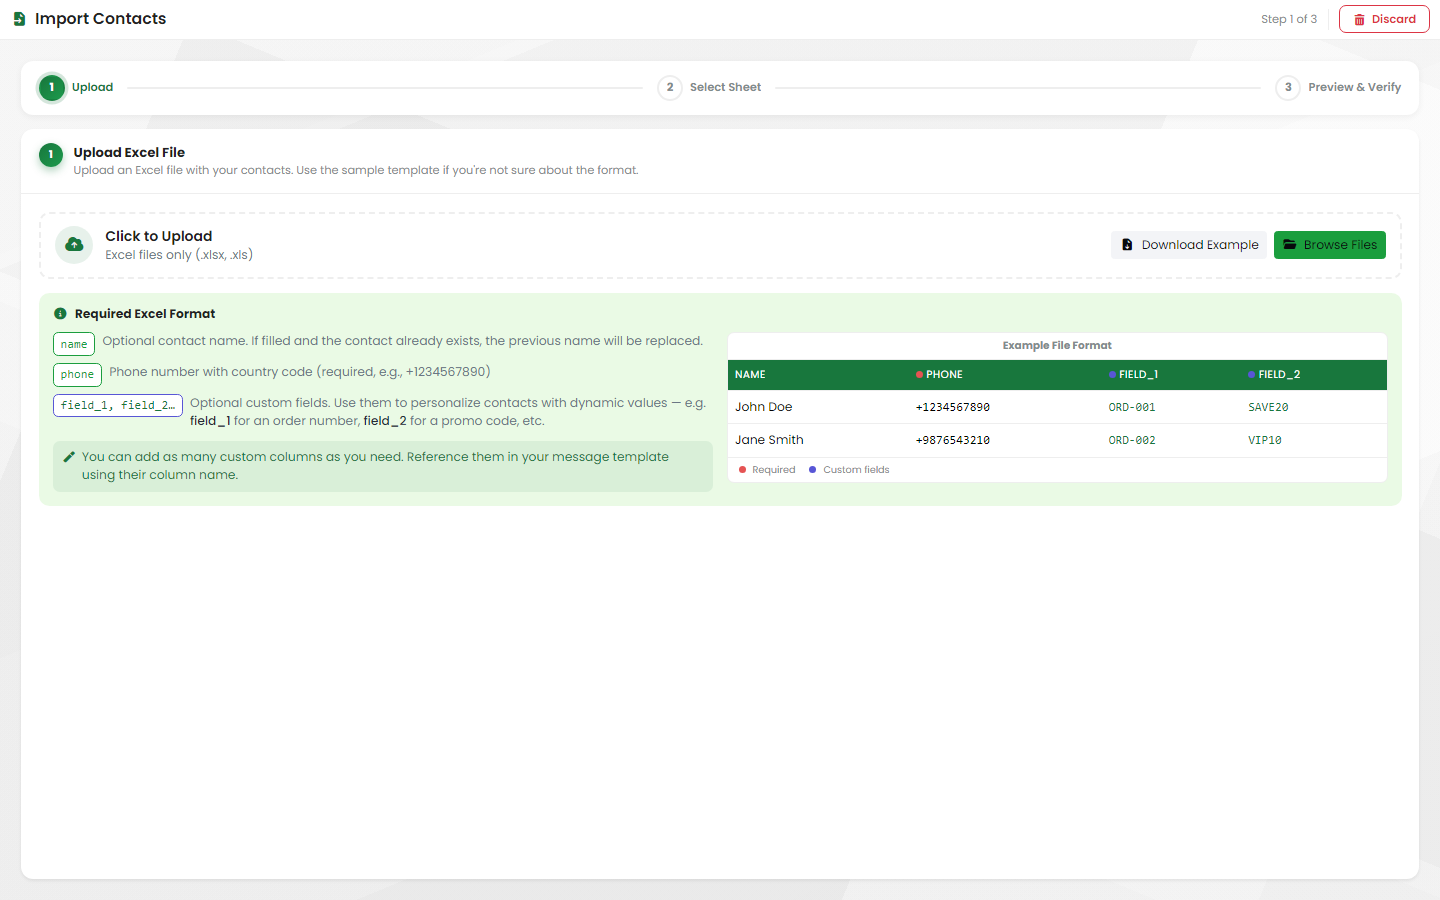
Your file must be an Excel file (.xlsx or .xls), up to 10 MB. Use these column headers:
| Column | Required? | What to put in it |
|---|---|---|
name | No | The contact's name. |
phone | Yes | The phone number with the country code, for example +9611234567. |
| Extra columns | No | Any other information, for example an order number or a promo code. |
TIP
On the first step of the import, click Download Example to get a ready-made sample file. Fill it in and upload it.
Numbers that aren't in international format (with a country code) can't be used for WhatsApp and are flagged as errors.
Extra columns are saved only when the column header matches the Field Key of a custom field you created for contacts. See Add your own fields.
Extra columns are not filled into campaign messages automatically. To personalize a campaign, you fill in each contact's values in the campaign's own sheet. See Campaigns.
Run the import
- Open the phonebook, click Actions > Import. (You can also import from Contacts with Actions > Import.)
- Upload: click to upload, or drag and drop your file.
- Select Sheet: pick the sheet that has your list.
- Preview & Verify: Midlr checks every row and shows:
- Total Records, Valid Records, Empty Rows Skipped and Errors.
- Rows with an invalid phone number. Fix the number in the table or delete the row. You can't import until all errors are fixed.
- Duplicates: rows that repeat a number already in the file. Only the first row of each number is imported. Click Remove Duplicates to clear them.
- Choose whether to tick Overwrite existing names. When ticked, contacts you already have get the name from your file. When not ticked, saved names are kept and only missing names are filled in.
- Check the phonebook. When you import from inside a phonebook, it's already picked. When you import from Contacts, picking one (Select Phonebook) is optional.
- Click Import.
WARNING
Don't close, refresh or leave the page until the import finishes. Contacts that haven't been uploaded yet won't be imported.
When it's done, you see a summary: how many contacts were Created (new), Updated (name), Already existed (no change), and skipped.
Numbers that are already your contacts are still added to the phonebook.
Manage contacts in a phonebook
Inside a phonebook you see totals (Total, Opted In, VIP, With Names) and a list of contacts with their Name, Phone, Username, Phone Book(s), Opt Status and Created date.
- Search by name or phone number.
- Click Chat to open a chat with the contact.
- Click Delete to remove the contact from this phonebook only. They stay in your contacts and other phonebooks.
Export a phonebook
Open the phonebook, click Actions, then Export CSV or Export Excel.
Give a phonebook to agents
You can assign agents to a phonebook. This matters when your business uses the Phone Book option for chat assignment (set in Business Config). Then each agent only sees:
- Chats of contacts in their phonebooks.
- Chats assigned to them or their group.
To assign agents:
- Open the phonebook.
- Click Actions > Manage Agents.
- Tick the agents who should handle this phonebook. Users marked Sees all chats already see everything, so they don't need it.
- Click Save.
You need permission to edit phonebooks to do this. See How new chats get assigned.
Use a phonebook in a campaign
When you create a campaign, pick the phonebook under Phonebook. The campaign is sent to the contacts in it. Contacts who opted out of marketing messages are marked Opted Out in the phonebook.
Midlr skips opted-out contacts and contacts you blocked automatically, so they don't get the campaign. You don't need to remove them from the phonebook first.
Delete a phonebook
Open the phonebook, click Actions > Delete Phone Book, and confirm.
WARNING
Deleting a phonebook can't be undone.
Deleting a phonebook deletes only the list. The contacts in it are not deleted: they stay in your Contacts and in any other phonebooks.